You have all seen them but if you've ever wanted to create one yourself, like this one I made the other, the following easy step by step instructions for Canva.com It's free to use, provided you don't purchase their 'at cost' desings and use it for something simple like a MEME. I also use this online site to create my daily YouTube thumbnails (let me know if you'd like to see how that's done).
The best size to use for MEME that will be shared on Facebook, Instagram or Twitter is 800x800 which is the Social Media selection on Canva (closeup shown below)
Click on the Social Media image and on the next screen select Uploads to select your photo file from your computer (hard drive, flash drive or SD card)
Pick the desired image, click open and the file will be uploaded. You will see it turn from grey scale to color (if your image is in color) from left to right till completed
Completed image will appear in your Uploads section on the same screen, to use an image in your MEME, simply double click it and it will be pulled into the edit panel on the right of the screen
You can then scale/resize and edit the image
One recommendation, the edit bar for the image will move with the resizing so if you want to edit the transparency, link or rate the image, you will want to do that while the image is smaller so the options display and don't drop off the screen, out of reach for selection
As you can see above, I made the image smaller so the Edit options would be visible on the screen
Because I was adding text over the image but didn't want it to compete or get too busy, the best way to combine the two is to make the background image partially transparent - my favorite is at 50%. Simply slide the button along the Transparency bar till you reach the desired saturation.
One the background is to your likeness, it's time to add text. Click on the Text link on the left hand navigator to open the available options. Some of the designs are FREE while the rest are available at a per item cost. I've never felt compelled to purchase any of the options because the FREE selection is robust enough for a variety of uses.
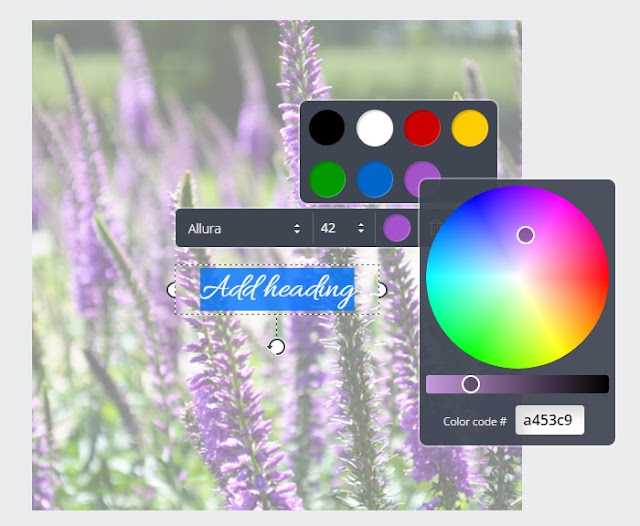
For my example I chose Subheading - you can change the font, size and color
The color code # is a very nice option especially if you are trying to keep uniform color
Font options are available to the right of the trash can
Once all your editing is completed (yes there is auto spell check which has saved a lot of embarrassment) you can save your file as an image or a .PDF as appropriate for your use. Most recently a High Quality .PNG was added which makes the final results that much crisper.
When you file is finished downloading, you can share it on Facebook, Tweet it or email. A copy of the saved file will be in your Downloads folder (Windows machines).
The final results are clean and presentable. It takes me only a few minutes to create one and once you have done a few it's it will only get even quicker. Be honest, you want try one, right? If you do, please share it with me. I'd love to see what you create! Cheers!


No comments:
Post a Comment
I love comments and constructive critiques, just be kind, this is just for fun after all.